Friday, July 27, 2012

The Matinicus Double Ender- Part 17


To view Part 1, click HERE.

First, a little interesting news- Back in May, I submitted a photo to Jamestown Distributors Facebook page for a contest they were running, and won $100 worth of merchandise! I had a funny feeling  when I sent it in that it might win. I don't know how long this link will be active, but for now it is. Also, there is talk of including the photo and maybe a little editorial background info in their 2013 catalog. We'll have to wait and see. Meanwhile...

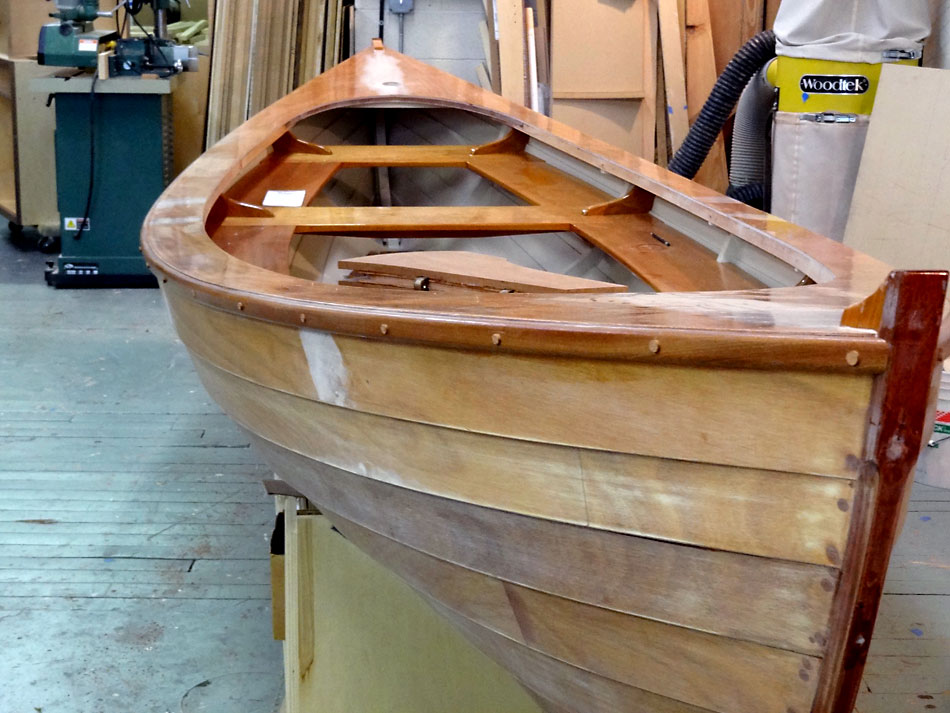
As I mentioned previously, I have to wait to paint the sheer strake until the last fasteners are in, and this means fitting support blocks for the big stand-up rowlocks. These are monumental things that have a big lever arm, so what holds them up has to be pretty strong. 

These rowlocks are 15" long, with a 5 1/4" shaft!
The stand-up locks share the same oarlock pads as the forward most rowlocks. They should be installed fairly close to the center of the boat which will allow pushing the boat either bow or stern first. Mine worked out to be about 6" forward of amidship. There is comfortable standing space aft of the dagger trunk to push the boat with the oars facing forward, but probably not so comfortable facing aft, because of the forward thwart. We'll see how this all works out. 

To start with, I plotted the oarlocks' positions on the deck. I put the center of each lock about 12" aft of the aft edge of the thwart. On this boat, there are two sitting positions, pulling either two or four oars, and a single stand-up position as I mentioned previously. Because of the length of the stand-up shafts, and the flare of the sheer strake, some careful layout was needed to make sure there was room for the shaft to pass through it's support block, and not hit the inside of the plank. I laid this out in section, full size, to find the location of the pads on deck. 

This is a murky photo of the full size layout, on a scrap of mdf.
The pads elevate the locks a little above the deck, and provide more bearing for the lock casting than just the decks would. The pads must be curved to fit the deck in plan, and tweaked a little where they bear on the deck to address the very slight twist and concavity as the deck follows the sheer curve. I first made patterns for both sets of pads, and laid out the lock centers on them. 

Oarlocks, patterns for the pads, and the pads themselves.
The pads need a little profile shape so as not to look clunky, and a long ogee works well for that. I happened to have an appropriate pattern for the edge shape from a previous boat, and dug that out. I made the pads from sapele, to match the coamings and rub rails, sawing out the plan curve first, then the profile shape. I cleaned up the ogee cuts on the spindle sander. The aft pads have just one hole for the oarlock casting, but the forward pads have this hole, plus the bore for the stand-up lock. The stand-ups go through wood only. I planned the bores in the pads to be perpendicular to their top surfaces. These were drilled out on the drill press, along with the fastener holes for the pads themselves. 

The pads are bored on the drill press.
The full set of oarlocks and pads. the pads are shellac sealed.

Instead of wood screws, I bored for #10 flat head machine screws. I should mention here that I glued on ply doublers under the deck in way of the pads, for extra stiffness. I clamped the pads on the deck, and bored through the deck for the fasteners. The forward pads have an extra set of machine screws through the bronze lock castings, to provide yet more support for the stand-ups. I then put in all the screws and ran the nuts and washers up tight, and bored the shaft holes through the deck, using the pad bores to keep everything lined up. 

The forward starboard oarlock pad, prior to boring out the deck.
Next I made the stand-up support blocks that get fastened to the inside of the planking. These are sapele also, but were painted to match the inside of the hull. The bore for these blocks is at an angle, which I found in the full size layout that I did. I tilted the table on the drill press, and bored the blocks before shaping them to somewhat of an oval. 

Stand-up rowlock support block.
The support blocks, before lanyard holes were drilled.
It occurred to me (not too late for once) to also bore small holes for rowlock lanyards. These lanyards keep the locks from being lost overboard (I have a good $300 in oarlock hardware on this boat!). Inside the boat, I taped off the locations of the support blocks, and sanded away the paint for a good epoxy bond to the plank. 


Paint is sanded away to permit bonding of the support block.
Before gluing them in though, I primed and painted the blocks, and carefully checked the fit of the rowlock shafts through the pads and blocks. I then installed them with screws through the planking. Now I can paint the sheer strake at any time.

The fit is checked...

... and the blocks are painted prior to installation (note lanyard holes).
I'll put several coats of varnish on the pads, and finish-paint the deck before permanently installing them. I don't want to glue these on, but will bed them right on the painted deck with an oil base bedding compound. I had glued Cricket's pads on with epoxy, then had to chop them off with a big chisel when I wasn't satisfied with their placement. Live and learn!

The starboard aft pad, in position.
The oarlock locations are evident in this shot.
A final note, while we are on the subject of oars. I've been thinking about what style oars I might make for this boat, out of what material, and how much time it will take, when out of the blue a nice pair of Shaw and Tenney's of the right length, kind of materialized. Ashok, my shop assistant was up in the Catskills on vacation and stumbled on a perfect pair, in an antique store of all places. The oars are quite old (maybe 30 or 40 years?) and belonged to the proprietor's dad, but they were little used, and have only a patina to show their age. $125! Quite a good deal. These oars have copper tips too, and are leathered and buttoned. The grips seem a trifle short, and I wonder if they were cut at some time to fit in a particular space. Anyway, we'll see how they work and I can always add a little length to the grips later if need be. For now though, that's one less thing to worry about. 

A pair of 8' Shaw and Tenney spruce oars.


Stay tuned...

Thursday, July 26, 2012

Building The Matinicus DoubleEnder- Part 16


I've actually been moving along on the boat, but I'm woefully behind on the blog posts. I hope to catch up soon, and I am going to make an effort to keep up with it, and also to add some non Matinicus posts. I've been working on a new boatbuilding shop at Sebago, a very nice 800 square foot shop with big sliding doors and benches, etc. but more on that down the road.

For now, let me catch us up quickly with some exterior hull painting that I completed a couple of months ago. Before painting, I covered the plank keel with a single layer of 6 oz glass (for abrasion), and wrapped the interior of the daggerboard cut out as well. 

Glassing the keel.
Glass is also folded down into the dagger slot.
The interior of the dagger trunk was covered in glass cloth before I put it together, so the keel cutout application completed the covering. I scuff-sanded the glass, and filled the weave with a thin fairing mix, then faired in the overlaps before painting with Petit primer/underbody. I spent a bit of time filling screw holes and touching up the lower plank scarfs. I had glued up the first few plank scarfs right on the boat, but was not happy with that result, so subsequent planks were scarfed on the bench (or floor) before hanging. This was a much better method, at least for me. 

Petit primer/underbody is applied and sanded out.
I then sanded out the primer with 220 tri-m-ite. I was surprised at how many scratches and what-not that it filled. I probably could have used another coat of underbody, but I felt like it was good enough. The proof is in the finish, and that speaks for itself!

Petit "mist grey" easypoxy.

Petit "mist grey" easypoxy.
This is three coats of Petit Easypoxy Mist Grey. The sheer strake will be Hatteras White, which I'll do after fastening the stand-up oar lock support blocks. That is what we'll do next.

Friday, April 27, 2012

Building The Matinicus Double Ender - Part 15


I've been making steady progress on Mouse over the last few weeks. I'm actually almost done painting the outside, after flipping the boat over, but that bit will have to wait until I catch the blog up to the present. Here's a little sneak preview. 

First coat of paint! More later...
But backtracking a little, one thing that needed doing was the drain plug. I bought a nifty "T" handle plug from Hamilton, but I didn't like the hull fitting it came with. I substituted a common 1/2" plumbing nipple, cutting it in half and bedding it in epoxy, in an oversized hole. 

The "T" handle plug, and sawn off nipple.

I actually had to drill 3 holes to set this up. The first 1-1/4" hole was bored just deep enough from inside the bottom to bring the nipple flush with the inside.

A stepped mortise was bored for the nipple and drain hole.

Before installing it, I bored a second 3/4" hole all the way through the hull, and filled that hole up with thickened epoxy. I then taped off the underside of the nipple (to keep epoxy out of the threaded inside) and set it in thickened epoxy. When cured, I drilled a 5/8" hole back through the epoxy bushing that I had earlier cast. The drain goes through the boat, but all of the wood is completely sealed with epoxy.

This old duck was used as a prop to keep the drain assembly upright while the epoxy cured.
I had previously finished the decking, and trimmed it off flush with the hull, so it was then time to install the rub-rails. I had a nice piece of 4/4 sapele to use, and this I ripped up and scarfed together to make a pair of rails. The wood was so stable, it didn't move a millimeter after ripping. 

A nice piece of sapele!
I used my old (20 years at least) scarfing jig to plane the tapers, and glued up both pieces on a flat table. 
8:1 scarfing jig.

The finished scarf.
The scarfing bench. Flat, with straight edges to aid in aligning the pieces to be scarfed.
Before fitting the rub-rails though, I went ahead and trimmed the stem-heads to final shape. I made patterns of the stems in thin ply, and transferred the layout to the boat, in ink so I could see it. I cut the shapes out as close as I could with a hand saw, chisels, and gouges (for the hollow bits), finishing up with a rasp and sandpaper. As a sidebar, I recently bought one of the newer hand-cut rasps from Gramercy Tools, and I love it. These are more affordable than the Ariou rasps, and are beautifully sharp and well balanced. I'll have the set eventually!

Bow stem pattern.

Marked out in ink and sawed close.

Cut to the line with chisels and gouges.

The finished bow stem.

The finished stern stem.
The rub-rails are a little tricky to fit, in that the ends have a compound bevel and have to be the exact right length. I often do this with patterns, but I was in a hurry, so I went for it, cutting the ends right on the boat without unclamping them completely. I measured the angles with two bevels, marked them out and made the cuts. They came out reasonably accurate, and I saved a pile of time. 

I sawed the ends right on the boat.

They fit pretty good. Its clear from this photo that the rails must be tapered.
After fitting the ends, I tapered the pieces in both thickness (siding) and in width (molding). They look much better tapered than straight, and anyway would have projected beyond the stem cutwaters, making it mandatory. I spaced out fasteners for the rails and bored the countersinks, then radiused the edges (the radius is tapered as well). To keep the rails clean during installation, I sealed them with a coat of amber shellac. I installed the rails with stainless screws, and bunged the counter-bores with plugs made on the drill press from a tapered plug cutter (the best).

Tapered, radiused, bored, and sealed with shellac.

Screwed and bunged!
I had now gotten about as far with the interior and deck as I wanted, and decided to go ahead and flip her upside down for fairing and finish painting. I gathered some help again, and we lifted her off the cradle. I'm quite pleased with her weight so far. Two of us could pick her up easily, and set her on the floor. We did get more help for flipping, though. No need for testosterone here; too much is at stake! It was fun to get a different view of the boat though, and sitting on the floor heeled over gave me better feel for her shape. I added cross pieces to the cradle and we flipped her right over onto foam pads at the gunwales.

Free at last, temporarily.

Stern view. Ashok is putting on the cradle supports.
 I've now done a lot of fairing, sanding, and painting, and I also put a layer of glass on the keel, but that report will have to wait for a bit. I won't be so long though, in getting the next post out. 'Til then...

Tuesday, April 3, 2012

Building The Matinicus Double Ender- Part 14

I'm quite behind in my blog posts. There has been some progress over the last month, but I just haven't gotten around to the blog. If there's anyone left out there, I'll catch us up...

Decking the Matinicus has proved to be one of the easiest and most straight forward jobs on the boat yet. I bought two sheets of 6mm ply as I was not sure how I would cut them out. But in the end, I decided to make the deck in 4 large pieces, with seams down the centerline at the ends and an additional two short fillers amidship, which I attached with typical butt blocks fitted between the sheer clamp and carlin. Consequently, all of the decking could be gotten out of one sheet.

I used cardboard for my templates. I get a couple of 4x8 sheets every time I have a plywood delivery, and its useful in many ways in the shop. And recyclable.

The cardboard template.
For the cutout around the stems, I hot-glued thin ply scraps to the patterns (my motto is- if you don't know what to do next, plug in the hot glue gun). I then traced off the shape underneath, inside and out, cut the patterns out with a utility knife, and laid them out on my occume ply.

Thin ply is hot-glued to the template to define the stem cut-outs.
The patterns are laid out on the 1/4" deck plywood.   
I cut the deck pieces out a little oversize, fitted them to each other and around the stems, then marked them out from underneath. Even when finish-cutting them I left my line, not wanting to worry about bevels and what not. I would plane the edges flush after gluing them on. When everything fit nicely (including the butt blocks amidship) I sanded and epoxy-coated the underside. It should not be left raw, of course, and nobody wants to hang upside down to paint the undersides after installation, least of all me. 
The rough cut decks are fitted together.

Two coats of sanded epoxy are applied to the deck's undersides.
I fastened the deck pieces temporarily with small screws. Actually, I drilled for and put in most of the screws prior to marking the panels. This way, the pieces will go back on exactly as they were fit dry. I also supplemented the screws with lots of blue tape clamps, pulling the edges down in between screws.
Butt-blocks are used to join the pieces of deck together amidship.
Toothpick fillers.
 I was able to do half of the deck each evening after work, and on the third evening, I removed all of the screws and plugged each hole with glue and a half a toothpick. I used Titebond 3 for this. The next morning, I cut off the toothpicks as far below the deck surface as I could, planning to fill up the void with epoxy filler. The deck seams (between each panel section) were also filled and glassed. Before filling though, I took a small grinder and cut a shallow trough down the length of each seam, to give a little hollow for the glass tape to lay into, without projecting too much above the faired deck surface. While I had some epoxy mixed, I dripped a little into each toothpick recess, to seal everything up.


Deck seams were hollow ground to make room for glass tape.

The seams are taped.

Here are a couple of views of the decks. I'm pretty happy with the whole thing, except that I wish I had put in just a little more crown. The coamings, when they go in, will help the appearance.


I'm now at the stage of fairing the deck surface, prior to coating with epoxy. For this, I thought I would try some of the System 3 "Quick Fair" two-part epoxy filler. The stuff is expensive, but I absolutely love it. The consistency is just right, every time, with no need to mix up a bunch of different dry fillers into liquid epoxy. Its a simple two to one mix, and I use various sized kitchen measuring scoops for the quantity needed. It feels like "spreadable butter" and doesn't tend to roll up under the knife, and doesn't have stray bits of grit and crap to mess up the coat. What makes it cost effective for a commercial yard is it's cure time. Four hours to machining! I'm hooked.


System Three Quick-Fair filler is applied and sanded fair.
So that's where we are now. I plan to hold off on the coaming, and install the rub rails next. Then, I'll flip the boat and do my outside finish painting! Can't wait.