I've been quite busy working on
Mouse, even though I haven't written to the blog recently. Several things have been happening simultaneously, though they are presented here in a linear fashion, so some photos may appear out of synch. The last piece of major structure to go in the interior is the main mast partner, and this has to be installed before the remaining deck framing can go in. I made the partner itself from 3 laminations of 9mm occume. The multi-directional grain makes a very tough partner, resisting any tendency to split or warp, and its 1-1/8" thickness is plenty stiff.
 |
| Checking the mast rake with a dummy stick. |
I decided to step the mast through a gate, rather than down through a hole, to facilitate easier stepping afloat (we hope). The mast will be square in section at the base, and will pivot up into a three sided enclosure. A pair of bronze straps are bolted to the partner, through which a stout pin will slide, capturing the mast. The partner opening will be lined with leather.
I cut out the mast opening, being careful to get the rake angle correct. I used a lofted measurement from frame #1 to lay out the position of the opening on the partner. I rounded over the top and bottom edges of the opening, to make it easier to pull the leather around. I'd been saving a piece of 1/16" bronze plate for just such an application, and dug this out to make the straps. I laid these out on the plate, and cut them with a hacksaw, then radiused the ends.
 |
| The straps are cut out of 1/16" bronze sheet... |
 |
| ...the ends are radiused and the edges filed smooth. |
I thought the bronze might be too flimsy for the job, but it proved to be very stiff, and quite tough to bend. I made a little wood jig to bend the plate around, but couldn't make the bend with any tool I had.
 |
| This jig for bending the plate was unsuccessful. |
I was pondering this problem, and mentioned it to my lighting designer neighbor. He said, "oh, I've got a Diacro bender in the shop, come on down and we'll make it happen". That's one advantage of being in NYC, rather than out in the woods! I had to walk maybe 200 yards to his shop, where we made the bends in about 15 minutes.
 |
| The plate is put in the bender, with the correct die... |
 |
| ...and the bender's arm swings around to bend the plate, effortlessly. |
The mast partner was saturated with 2 coats of epoxy, and painted (along with the knees that hold it in the boat), before leathering the opening and bolting on the straps.
 |
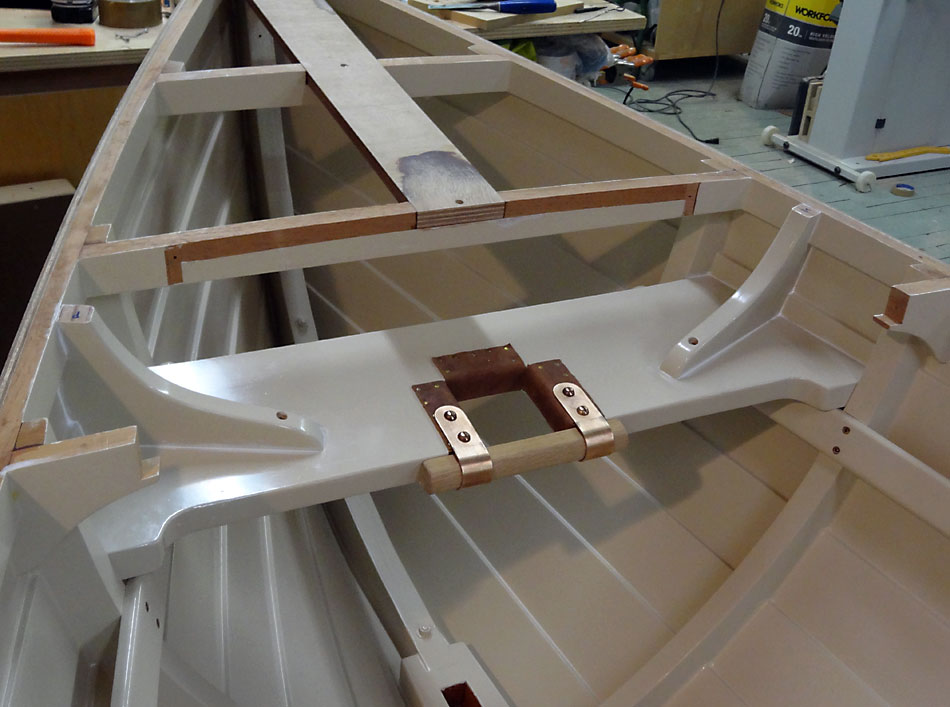
| This is what the straps will look like. |
 |
| Epoxy saturated plywood. |
The leather is another little story. Just across the hall from my shop, a leather artisan recently moved in, and she gave me a nice little scrap of hide for the job. Her outfit is called
Kika NY. Check it out. I used up the last of my stash of brass canoe tacks (that I got from Rollin Thurlow, when I took his canoe restoration class at Wooden Boat about 20 years ago) putting on the leather chafe guards. I used the tacks, plus some contact cement to hold the leather in place, wrapping it from the top around to the bottom of the partner.
 |
| Leathering the partner. |
I next made a stout oak pin to slide in the straps. The pin is radiused on one edge, and flat on the other where it bears against the partner.
 |
| Making the oak pin. |
I drilled out the top of the bronze straps and the partner on the drill press, but clamped the straps on with the pin in place to drill all the way through. I wanted the fit to be perfect. The pin should slide easily, which it does. The mast will be snugged up in its cutout with a wedge driven down between it and the oak pin. With the partner assembly complete, I installed it in the boat, along with the knees. I used Sikaflex where the parts all bear against the hull, and between the knees and the partner.
 |
| The completed mast partner. |
While all of this partnering was going on, I was also working on the deck carlins and the fore and aft beams in the center of the end decks. Though the term is not quite accurate, I'll call these longitudinal beams "king planks". The mizzen mast will step through the aft king plank, so a hole must be drilled at the correct angle to account for the mast rake. This is a little tricky, as you will see. I like to use plywood here like I did the main mast partner, for its resistance to splitting. Both fore and aft king planks will support deck cleats also, so they should be strong. There is a shallow curve down the length of both king planks, like the curve in the sheer, so I laminated two thicknesses of plywood right on the boat, fitting them in notches cut in the deck beams, and trimmed to fit the stems and inwales in the ends of the boat. This is also a good way to use up scrap ply left over from the planking.
 |
| The deck beams are notched for the king planks. |
 |
| The king plank blanks are laminated right on the boat. |
I took the mast angle right off of the lofting with a bevel gauge, and used it to set up the drill press.
There are a couple of different ways to go wrong here, and I did them both. For one thing, I measured the angle relative to the water-plane, rather than normal to the sheer, for some reason. So the angle of the drill press was not right. The other thing I did was orienting the plank the wrong way on the drill press, so the angle would have been backwards.
 |
| A 2-1/2" hole saw is set up to drill the mizzen hole. |
I had just started drilling, when something clunked into place in my mind, and I stopped. I went back and re-measured the angle, changed the drill press, and flipped the plank end for end. I had only drilled into it a little way, so I was able to correct the error without having to make it over again!
 |
| The correct angle and orientation! |
Before gluing the king planks in, I masked off the areas not to receive glue, and put a plastic drop down in the hull to protect the paint from drips.
 |
| The king planks are epoxy saturated like the mast partner before installation. |
At the same time, I worked on fitting the carlins. These fore and aft members define and support the deck around the inside, along with the coamings (to be fit later).
 |
| The carlins are clamped in place. |
I use scrap stock to get the compound angle at the cut ends right, before cutting the actual pieces. These have to fit just right at both ends, and to that end I have developed my own method of fitting. I get one end perfect, then mark a reference line on the boat and carlin about midway down. I then fit my scrap piece at the other end, and transfer the reference mark from the boat to the scrap. I then measure from the long point of the cut end on the scrap back to the reference mark, and transfer that number to the actual carlin (works for inwales too). I make the cut a hair long, maybe 1/32" and bend in the carlin. It doesn't quite fit at one end, but I run a saw cut between the faying surfaces, twice if necessary, and it drops right in place. No more shims!
 |
| Running a saw blade between the joint for a perfect fit. |
At this point, I've epoxy coated the inside faces of the carlins, and I'm ready to fasten them in. The oval deck beams at each end of the boat are next, and I'll cover that next time. Hang in there, we're getting closer and closer!